Showing posts with label Tutorial. Show all posts

Friday, April 11, 2014

...I showed a toddler how to make MORE noise.

We're doing a modified homeschool preschool program that calls for one subject a day. One Thursday, which happens to be art/music day, I felt brave and decided to let the kiddos make musical instruments. Aside from putting beans in an empty bottle, it doesn't get much simpler than this.

What you'll need:

-small paper plates (2 per instrument)
-beans
-crayons (or markers)
-tape


How to do it:

-Let the kids color all over the paper plates! The one in my photo was done by me for a little guy I babysit who can't quite color for himself yet. The other two 2 year olds I had that day, however, had a blast decorating and coloring (and "writing") on their plates.

-Put a handful of beans in one plate, and tape the second plate on top. I used duct tape split in long strips down the middle. I chose duct tape because it's super sticky and unlikely to come apart during play, but also because the youngest one might have decided to chew on the edges and duct tape is mostly waterproof ;)


That's it! You could experiment with more or less beans to make different sounds, or use bells, rice, sand...really anything...to make different tones. This ends up being a tambourine/maraca hybrid, but the kids didn't exactly mind not having a real name for their instrument.

(first photo is all the supplies and the tape ripped down the middle..second photo is how I taped it all together)

Thursday, February 6, 2014

...I stood by as my 2 year old made paper clay Valentines!


...Ok, so I did more than just stand by, but she did a lot of it on her own, and I am so proud of her! I wasn't sure if paper clay was something I'd made up or if it was something that actually existed. Turns out, there are actually many different recipes for it! I'm not the inventive genius I thought I was, but I did have to come up with my own recipe because all the others I was finding involved joint compound (1. I don't have that in the house, and 2. I don't want my 2 year old playing with it). I'm really excited about this one, so, without further adieu, here's the tutorial!


:-•:*"*:•.-:¦:-•*"!*•-:¦:-•:*'''*:•-:¦:-•:*"*:•.-:¦:-•*"!*•-:¦:-•:*'''*:•-:

Supplies:

  • 4 pages of newspaper
  • 4 cups of water
  • 4oz tube of Elmer's school glue
  • Large mixing bowl
  • Large sauce pot
  • A fork (maybe two, my daughter hijacked mine so I had one of my own, too)
  • Blender (I have a tiny one-serving blender, and it worked just fine)
  • Cookie mould (see photos of the one I used, otherwise I'm sure you could just form this into the shape you want on a regular cookie sheet since it dries in stead of melts)
  • *optional* acrylic paint if you'd like to tint the pulp (I used red for our Valentines)

:-•:*"*:•.-:¦:-•*"!*•-:¦:-•:*'''*:•-:¦:-•:*"*:•.-:¦:-•*"!*•-:¦:-•:*'''*:•-:
 

Steps:

1. Shred and Boil (kid shredded, I boiled):

Shred the newspaper and add it to the large sauce pot with all the water. Set it to high until it starts to boil then lower to medium for about 10 minutes. This softens the paper enough to shred easily in the blender. Technically you could skip the boiling, but it made the pulverizing so much easier!!


:-•:*"*:•.-:¦:-•*"!*•-:¦:-•:*'''*:•-:¦:-•:*"*:•.-:¦:-•*"!*•-:¦:-•:*'''*:•-:
 

2. Pulverize (kid pulverized):

Spoon the newspaper shreds into the blender, adding just enough of the water you just boiled it in to cover the paper (I scooped it out with a ladel, no exact measurements though). Not enough liquid will have the paper shreds sticking to the sides of the blender, too much isn't a big deal but it will make more work for you when you get to the draining step.


:-•:*"*:•.-:¦:-•*"!*•-:¦:-•:*'''*:•-:¦:-•:*"*:•.-:¦:-•*"!*•-:¦:-•:*'''*:•-:
 

3. Drain (I drained):

When all the paper is shredded, it's still going to be really hot. You have a couple options: 1-put it in the freezer for a few minutes, 2-set it aside and wait it out, 3-stir it a little to help aerate the pulp enough to drop the temp low enough that you can grab a handful. (I just stirred it, took about 2 minutes). I just used my hand to drain as much liquid out as I could. Again, this is not an exact science, it just needs to be a clay-like consistency.


:-•:*"*:•.-:¦:-•*"!*•-:¦:-•:*'''*:•-:¦:-•:*"*:•.-:¦:-•*"!*•-:¦:-•:*'''*:•-:


4. Mix (kid mixed):

The kiddo squeezed the bottles, so this is another step she basically did herself. We added the entire 4oz tube of glue and as much of the red paint as she wanted, which ended up being about 2.5 tbsp (turned out a nice red...considering it was mixed with gray newspaper pulp). She mixed it with the fork until everything was nicely blended.


:-•:*"*:•.-:¦:-•*"!*•-:¦:-•:*'''*:•-:¦:-•:*"*:•.-:¦:-•*"!*•-:¦:-•:*'''*:•-:


5. Mould (kid moulded):

For our cookie sheet mould we only needed about 2 tbsp. of the pulp per heart, and we had enough to make 20 hearts. It should be about 4-5 mm thick (it will thin out as it dries, but won't dry evenly if it's much thicker). We used our fingers to spread the pulp out evenly and pat it down into the moulds, the fork was just taking too long ;)


:-•:*"*:•.-:¦:-•*"!*•-:¦:-•:*'''*:•-:¦:-•:*"*:•.-:¦:-•*"!*•-:¦:-•:*'''*:•-:
 
 
6. Dry:

This is another part that was up in the air in my searching. Some sources said to just air dry it, some said to use a kiln on the lowest settings, some said to use the oven. I used the same method I use for dehydrating fruits: preheat the oven to 250 (f), bake for 45 minutes.

If you choose to air dry, it can take anywhere from 2 hours to overnight (the timing can vary depending on how thick your clay is, how much paint you added, the humidity and temperature in your house, etc..)


:-•:*"*:•.-:¦:-•*"!*•-:¦:-•:*'''*:•-:¦:-•:*"*:•.-:¦:-•*"!*•-:¦:-•:*'''*:•-:


To complete her Valentines, my daughter painted each one herself. (They look like cookies, but they're wafer thin and a little concave on the back.)
 
 
Then we put two back to back, and filled them with a little handwritten note and pre-wrapped valentines candies (jellybeans, Smarties, etc..). Then we tied them shut with a ribbon bow; no adhesive or glue needed to hold these together, so the other kids at the Valentine's party will be able to get their treats pretty easily.

 
Love them!! We may need to paper clay crafts more often!


Thursday, May 23, 2013

...I'm using fruit as laundry detergent for my cloth diapers!!

Ok, not exactly. It's an organic alternative called SoapNuts. It's literally the dried hull of a berry!

From their website: "...SoapNuts are a berry that grows in the Himalayas that naturally produces a soap. The soap is called saponin, a natural cleaner that works as a surfactant, breaking the surface tension of the water to penetrate the fibers of your clothing, lifting stains from the fabric and leaving dirt suspended in the water that is rinsed away."

 I'd heard a lot about them, even saw them on Shark Tank once, and general consensus is that they are gentle enough to be used for face wash, yet effective enough for laundry detergent....I'm focusing on its use as a detergent here. I also have another tutorial on DIY detergent (here) but that version isn't cloth diaper safe. I love the way it makes everything smell and feel, and it's my beloved inexpensive go-to detergent for all our other clothes, but I needed to find something money-smart to use on the cloth diapers...so, here it is!

I lucked out and had a friend who invited me to a co-op so we got an incredibly low price for a large lot of SoapNuts, but they can also be purchased from the company (here) in different quantities (anywhere from samplers, to 10 loads worth for $4.50, to 360 loads worth for $29.95...still cheaper than store bought at 90 loads for $20!!)

For no reason other than I just like liquid detergents, I searched the internet for a way to make liquid detergent out of them (the company sells the liquid, but I got the deal on the nuts themselves, so I'll just have to make it.) As with most organic and DIY products, I found a lot of different ways to make it. It was trial and error, but this being my first trial I'm pretty happy with how it turned out! Here's how I did it:
 :-•:*"*:•.-:¦:-•*"!*•-:¦:-•:*'''*:•-:¦:-•:*"*:•.-:¦:-•*"!*•-:¦:-•:*'''*:•-:

 
Step 1: Gathering the supplies!

                                                    - 4 cups of water (then 3 more later)
                                                    - 15 soap nuts
                                                    - A medium sized pot
                                                    - A clean container to store your detergent
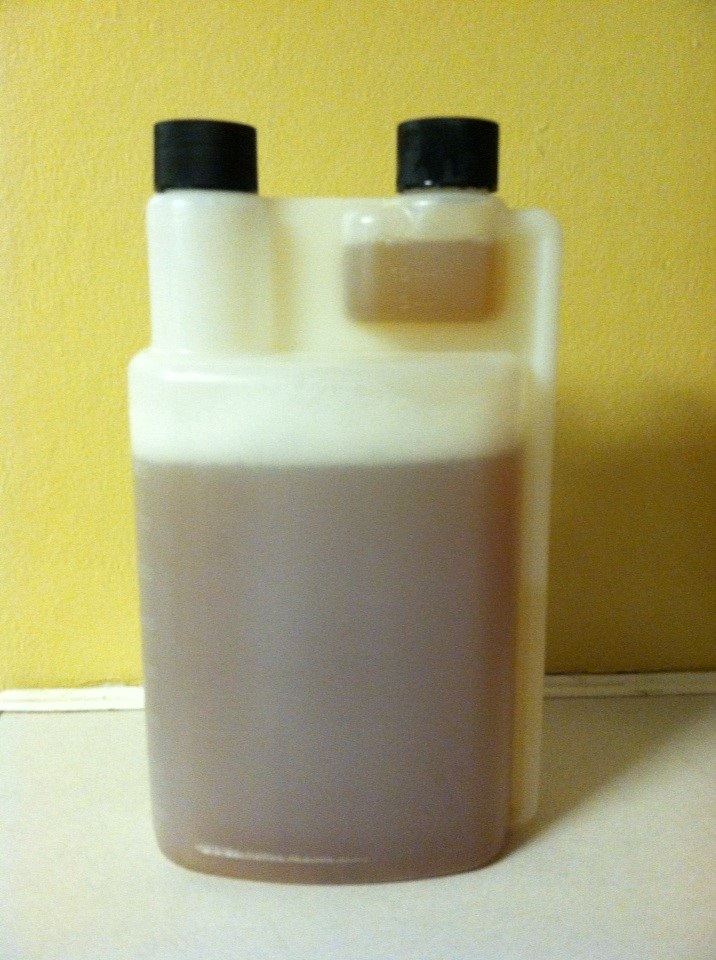
                                                      (I used my empty Charlie's Soap liquid bottle
                                                    because it  has that nifty 1oz measuring cup on top!)


:-•:*"*:•.-:¦:-•*"!*•-:¦:-•:*'''*:•-:¦:-•:*"*:•.-:¦:-•*"!*•-:¦:-•:*'''*:•-:

Step 2: Put 4 cups of water in the pot, and let your assistant add in the nuts.


:-•:*"*:•.-:¦:-•*"!*•-:¦:-•:*'''*:•-:¦:-•:*"*:•.-:¦:-•*"!*•-:¦:-•:*'''*:•-:

Step 3: Boil the nuts!

Set the stove to medium-high: they will boil over like noodles so adjust the heat if needed, you only want a nice rolling boil. I used a meat tenderizer to smush them a little during cooking. In the laundry they're bumped around to release the soap, so I chose to immitate (overboard) that during this stage.

I also checked the color of the nuts periodically. When all the soap is out of them they are a dull gray-brown color, so I was checking that their rich chocolate color was gone (that's truthfuly how I judged how long to boil them for!). About every 20 minutes I added 1 cup of water to replace what was evaporating, and did this over a 1 hour period.


:-•:*"*:•.-:¦:-•*"!*•-:¦:-•:*'''*:•-:¦:-•:*"*:•.-:¦:-•*"!*•-:¦:-•:*'''*:•-:
 
Step 4: Let it cool, filter, and bottle it!

You don't have to wait too long to filter and bottle it, just long enough to be able to handle it and not have it melt your container ;)

I use my cloth diaper wipes (cut up t-shirts) as filters with all my homemade products, but cheesecloth will work too.
 
 
 :-•:*"*:•.-:¦:-•*"!*•-:¦:-•:*'''*:•-:¦:-•:*"*:•.-:¦:-•*"!*•-:¦:-•:*'''*:•-:
 
And here is the finished product! This is good stored in the laundry room cabinet for 3 weeks, longer if you store it refrigerated. (I'm using 2oz per load, seems to be just right.) The detergent itself has a soft nutty smell, but the laundry doesn't pick that up...it's just clean.
 
 
:-•:*"*:•.-:¦:-•*"!*•-:¦:-•:*'''*:•-:¦:-•:*"*:•.-:¦:-•*"!*•-:¦:-•:*'''*:•-:
 
**SPECIAL NOTE**
 
When I strained the detergent I had a handful of almost-gray hulls, but in stead of tossing them I'm going to keep them frozen until I make this again. There's no harm in using them again, it can only draw more soap from them, and I'd hate to waste any bit of soap these things have in them.


Friday, April 19, 2013

...I made laundry detergent, and the baby helped!!

I was watching 19 Kids And Counting (or 18, or 17...however long ago it was!!), and Michelle Duggar mentioned that she makes her own laundry detergent. Never in my life had I even considered doing it, but when I heard her mention that they save hundreds of dollars a year by making it in stead of buying it....I jumped on the bandwagon! You can find the original recipe here, but I'm going to share how I do it also.

You will need:
-1 Fels-Naptha soap bar (right next to the Borax at Walmart, Kroger, and Target)
-1 cup Arm & Hammer Super Washing Soda*
-1/2 cup Borax
-4 cups water to boil
-2 five gallon buckets ($2.50/ea at Walmart in the paint section)
-Lavender Essential Oil
-Tea Tree Essential Oil
-5 to 6 empty liquid detergent containers (or 9-10 xl pickle jars!)

*Baking Soda will not work, nor will Arm & Hammer Detergent - it must be sodium carbonate!!


Instructions:

Step 1: Grate the Fels-Naptha Bar


Step 2: Bring 4 cups of water to a boil and add the grated soap (yep, looks like cheese). Reduce heat to Medium heat, then whisk occasionally until all chunks of soap are dissolved. You do NOT want to rush through this part and end up with chunky liquid laundry detergent!


Step 3: While your soap is melting on the stove, fill one of the buckets half full with warm water. From this point on I completed all of the steps in the bathtub to avoid a huge mess, and it gave the little one just enough access that she could "help" without actually getting into any of it.


Step 4: Add 1/2 cup Borax and 1 cup Washing Soda to the bucket of warm water. (You can see a faint color change in my measuring cup at the 1/2 cup mark: bottom is Borax, top is washing soda.)


Step 5: Pour melted soap into the warm water and mix well with either a wisk or your hand. (Baby helped me here. Her cup had plain water.)


Step 6: Fill the bucket up the rest of the way with cold water (or let your assistant do it for you). The cold water helps the soap gel quicker. The Duggar option is to let it sit overnight to gel, but "aint' nobody got time fo' dat".


Step 7: Pour 1/2 of the contents of your first bucket into your second bucket, then continue to fill both of them to the top with cold water. If you choose to use just one 10 gallon bucket you can skip this part, but lifting a 10 gallon bucket to funnel the detergent into the storage containers is too heavy, and using a scoop can lead to too many spills for me. Do whatever works for you ;-)


Step 8: Add 10 drops per 2 gallons of Essential Oils. Here you see baby adding Tea Tree Oil to one bucket, and the other bucket we added Lavender. They smell great together also, but you can add whatever oils you prefer. Fels-Naptha has a light minty smell to begin with, so you could actually skip the oils alltogether if you prefer.


Step 9: Funnel your detergent into your storage containers. I added labels at the end, but to make it easy to tell what scent each container had I used the red-orange Tide bottles for my Lavender, and the white (Dreft) and green (Gain) bottles for the Tea Tree.


Finished!! We ended up with two Lavender, two Tea Tree, and one mixture. For long-term storage you can keep this detergent just like you would any store-bought brand. In the meanwhile, when you use your detergent make sure to shake the bottle a little before pouring it into your laundry just in case any of the oils separate to the top, or any bits of soap settle to the bottom.

-Top Load Machine- 5/8 Cup per load (Approx. 180 loads)
-Front Load Machines- ¼ Cup per load (Approx. 640 loads)


SPECIAL NOTE: This laundry detergent is NOT cloth diaper safe. The soap in recipes like this can cause buildup, so I've found other options for washing cloth diapers. Right now I use Charlie's Soap plus my DIY BacOut, but I also have an order of Soap Nuts coming. When the Soap Nuts come in I'll be experimenting with how well they work in our water and with how to make liquid laundry detrgent from them too!!


..I made my own Citrus Enzyme Cleaner!!

Because we use cloth diapers, we've learned that there are certain products that we can and cannot clean them with...we've also learned that sometimes the more natural a product is, the fewer ingredients they have, the more safe and effective they are at cleaning our diapers without harming them. Namely, a product called BacOut (by Biokleen). It uses naturally occurring citrus enzymes to break away and disinfect the grime and buildup in diapers, plus it actually helps to clean your washer as it runs through the system.

BacOut is a little pricey, though. So, I started doing some poking around online and found a way to make my own (here). The great thing about this recipe is that it not only works in your laundry, but it can be added to basically every household cleaner you make to boost cleaning power.

There are two ways of doing this: one involves adding yeast which speeds the fermentation process to only two weeks, the second is to leave out the yeast to let fermentation happen naturally which will take 3 months. If you choose to leave out the yeast, just skip that step ;)

Citrus Enzyme Cleaner Recipe:

Ingredients:
-2 cups citrus scraps (orange, lemon, or lime peels and pulp)
-1 liter (4 1/4 cups) water - distilled is best
-1/2 cup brown sugar
-1tsp yeast (optional, to speed up proces from 3 months to 2 weeks)
-2 liter bottle (or any large glass or plastic container, I used a container from my husband's protein shake mix and an xl pickle jar)
*because my container was so large I doubled this recipe

Instructions:
-Pour brown sugar into the 2 liter bottle
-Chop or slice citrus scraps to 1/2 inch pieces, then add into bottle
-Add water and yeast
-Screw on lid and shake to dissolve sugar
-Mark with "Ready" date

Shake and release gas daily. This recipe relies on fermentation so there WILL BE GAS BUILDUP. You have two options: Leave the lid slightly unscrewed, or release the gasses daily. I chose to just unscrew the lid once a day when I shook it.

When your cleaner is ready you'll have to filter it before bottling it to remove all solids. I used one of our cloth diaper wipes (cut from old t-shirts) for a filter, but you can also purchase cheese cloth at a fabric store to do the job.

I filtered the cleaner first into a large pitcher, seen here with my second batch in a glass pickle jar (still 'cooking')

A square of old t-shirt works perfectly for filtering!

After filtering once into my pitcher, I used the same process to filter it again into my empty BacOut bottle. I store the BacOut bottle in the laundry room for easy access there, and also had enough to fill a large spray bottle for everyday cleaning.

Bonus: If you spill some on the counter like I did, it's okay! This stuff is a CLEANER so just use your 'mess' to wipe of your countertops :D

So far I've used this on natural and finished wood, bathroom surfaces (including toilet), kitchen sink and counters, in my homemade glass cleaner, and on linoleum flooring and it passes every test!

The original site OneGoodThingByJillee also notes the ratios to add your Citrus Enzyme Cleaner to your other household products, and lists a few additional uses:

1) for dishes and laundry (use 1/4 cup of enzyme)
2) for washing bathrooms and toilets. grime comes off easily (1 part enzyme to 10 parts water)
3) for removing stubborn stains and odours (coloured fabrics and floors) (use undiluted)
4) to clean vegetables and fruits (1 part enzyme to 10 parts water)
5) clear blockages in kitchen sinks and drains (use concentrated or blended pulp/sludge of enzyme)
6) as a natural insect repellent (use undiluted) for ants, cockroaches.
7) for mopping floors (1 part enzyme to 20 parts water)
8) as fertilizer for plants (use 1 part enzyme to 20 parts water, or use the leftover mop water)
9) as a skincare product, e.g. facial cleanser or toner (1 part enzyme to 2 parts water)
10) wash cars – cars will look as if they have just been polished! (1 part enzyme to 20 parts water


SPECIAL NOTE: After making the orange version of this, I think I would prefer to use limes next time. I like the smell of the oranges, but a more lemon- lime scent would be awesome!

Tuesday, February 12, 2013

...I cut up a disposable diaper, just to see what it looked like.

Many educators already know about this one. Disposable diapers contain a chemical called polyacrylate (sodium polyacrylate). This is the stuff that supermarkets and hospitals sprinkle on spills to turn them into gel, and it's also sold in packets under the name "Squishy Baff". It really is some very cool stuff, and this "experiment" is a great way to get your kids to follow instructions while using their own natural curiosity to pick apart layers, and discover just how much water this polyacrylate can hold.

What you need:
  • Disposable diaper
  • Scissors
  • Water
  • A Plate or pan to do the water drop portion
The Procedure:

Step 1: Cut a square out of the diaper


Step 2: Separate the cotton layer from the outside layer. (This peels off pretty easily)


Step 3: The outside layer is actually two layers stuck tightly together,
so you'll need to use your fingernail or edge of the scissors to separate them.
             ( It helps to slightly wet the edge to let some of the polyacrylate
activate, it makes separating these layers easier)


This is the three layers, plus the little parts of the polyacrylate layer I cut out.
The one on the left is dry, the one on the right has water added


The one on the left is dry, the one on the right has had almost two teaspoons
of liquid slowly dripped on it!! These pieces are 1in x 1/2in, imagine
 what the whole diaper would look like!

...I let the baby make her own Valentine's Day cards.

We have a toddler playgroup this week and the theme is Valentine's Day. The kiddo's will be having a little V-Day party with cupcakes and they were invited to bring little Valentines for each other. Knowing how talented this kid is, I decided to have her make them....well, I decided that WE would make them, since she can't work the computer or scissors yet!


What you'll need:
  • Black cardstock paper
  • White printer paper (to pre-print the inside)
  • Glue stick
  • Scissors
  • Paint (I used acryllic, but the talc type will show up well too!)
  • Stickers (to close the Valentine)
The Process:
  1. Let baby/toddler rub paint all over the black cardstock, then set it aside to dry. (the humidity of the paint may warp the cardstock a little, and that's fine. When it's all folded and complete you'll never be able to tell.)
  2. Find a cute, simple Valentine's quote or photo to put on the inside of your cards and print as many as you'll need. I used the Paint program to arrange my pictures and add wording, then copy/pasted them into Word to size them to take up the whole sheet. I did 4 cards per page and that size was perfect, and I ended up printing 12 on just 3 sheets of paper.
  3. Glue the inside to the blank side of the painted cardstock.
  4. Cut them apart, fold them in 3rds, and seal them with a sticker (or let baby/toddler put the stickers on if they're coordinated enough).

Thursday, January 31, 2013

...I refuse to measure when sewing. (Doll dress tutorial)

I can't even explain how much I don't like measuring. I don't have a problem with using patterns if I can just pin it and cut, but knowing that I have to measure anything just makes me not want to do it. For that reason, this (and most of my tutorials) don't have measurements. It wouldn't really make sense for this one anyways, because dolls come in all shapes and sizes! (My seamstress mother probably isn't happy about that...she taught me better.)

:-•:*"*:•.-:¦:-•*"!*•-:¦:-•:*'''*:•-:¦:-•:*"*:•.-:¦:-•*"!*•-:¦:-•:*'''*:•-:

So, this is my EASY doll dress tutorial. No measuring, no buttons or buttonholes, no elastic.
Here's what you need:

-Sewing Machine
-Shirt or dress that fits your doll
-Scissors
-Scrap Fabric (should be twice as long as your doll, and a little wider than the shirt/dress)
 
:-•:*"*:•.-:¦:-•*"!*•-:¦:-•:*'''*:•-:¦:-•:*"*:•.-:¦:-•*"!*•-:¦:-•:*'''*:•-:
 
STEP 1: Cut the dress
 Fold your fabric in half, then lay your shirt/dress at the crease. You will use the crease as the shoulders so there is no need to cut your fabric into two. As shown in the photo, trim away the armpit in a long triangle to give the dress it's shape.


 :-•:*"*:•.-:¦:-•*"!*•-:¦:-•:*'''*:•-:¦:-•:*"*:•.-:¦:-•*"!*•-:¦:-•:*'''*:•-:

STEP 2Cut the neck hole
 Make a small cut (about 1/2 inch long) in the center of the fold (A), then use that opening to insert the scissors and cut along the fold- use the shirt to determine how long this opening should be.
 (This photo also shows Step 3 already completed.)


:-•:*"*:•.-:¦:-•*"!*•-:¦:-•:*'''*:•-:¦:-•:*"*:•.-:¦:-•*"!*•-:¦:-•:*'''*:•-:
 
STEP 3: Cut the back opening
This is the time to choose which side you want to be the back. On the side you choose to be the back, continue straight down the 1/2 inch cut, using the shirt as a guide as to how far down this cut needs to be (about 2-3 inches). It only needs to be large enough to allow the doll's head to fit through the top, so you can test it by putting the doll's head through this hole to be sure it's big enough.


:-•:*"*:•.-:¦:-•*"!*•-:¦:-•:*'''*:•-:¦:-•:*"*:•.-:¦:-•*"!*•-:¦:-•:*'''*:•-:
 
STEP 4: Seams
Sew simple, one stitch lines to make seams along the sleeves and  bottom of the dress.
(Photo shows the entire piece of cut fabric layed out, arrows pointing to the edges to be seamed)


:-•:*"*:•.-:¦:-•*"!*•-:¦:-•:*'''*:•-:¦:-•:*"*:•.-:¦:-•*"!*•-:¦:-•:*'''*:•-:
 
STEP 4: Edging the neck and back
 
For the back, fold the edge over at a slight angle and sew a straight stitch. I let the foot hold the bottom edge down for me, then back stitched a few times to help strengthen the fabric right at the split.


For the front of the neck, I folded the edge over at a slight angle just like the back, and sewed another set of straight stitches.


To complete the back of the neckline, I repeated the angled-fold and single straight stitch.


So, with all of that done, the entire back/neck opening now looks like a Thor's Hammer:


:-•:*"*:•.-:¦:-•*"!*•-:¦:-•:*'''*:•-:¦:-•:*"*:•.-:¦:-•*"!*•-:¦:-•:*'''*:•-:
 
STEP 5: Closing the edges
Line up your fabric with right-sides touching, then sew it up with a simple stitch.
(Right sides=the side you want to be on the outside of your dress).


:-•:*"*:•.-:¦:-•*"!*•-:¦:-•:*'''*:•-:¦:-•:*"*:•.-:¦:-•*"!*•-:¦:-•:*'''*:•-:
 
LAST STEP: Turn the dress right-side out, and put it on the doll!


:-•:*"*:•.-:¦:-•*"!*•-:¦:-•:*'''*:•-:¦:-•:*"*:•.-:¦:-•*"!*•-:¦:-•:*'''*:•-:
 
My daughter is going through a learning phase in which she is practicing taking her doll's clothes off and putting them on, which is why I made this dress as quickly and simply as possible, so I chose not to finish the back with any kind of closure (it wouuld get dammaged from use). However, you can easily add velco, buttons, magnets, or just stitch it right up the seam so that it can't be taken off.